Week 1: Project management.
The assignment:
Work through a git tutorial and build a personal site in the class archive describing you and your plans/sketches for a potential final project
Below you find my tutorial on git. Use the menu on the top right to find my "about me" and "my final project" pages
What is git?Git is a tool for version control. It is most used for developing software. But it can be used for other purposes as well, like managing the work we do at the FabAcademy. We have to document everything we do on our website and in order to build the website and get it all online we use several tools. Git is one of them. Git allows you to track the changes you make during the documentation process. It makes it easy to go back and revert to previous states if you make mistakes. Git is a distributed version control system, which means that we have a a local copy of the files from the remote main repository. The Git structure looks like this:
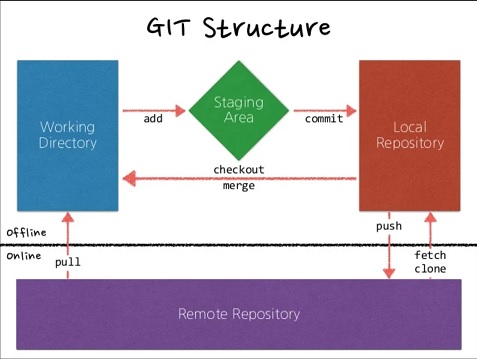
A workflow can look like this: Pull – add – commit - push. This will synchronize the local files with the remote files
Setting up gitSetting up git was a bit confusing and I didn’t always know what I was doing. I relied on the tutorial provided by the lab and followed the steps from there. This is how I went through the steps and can be used as tutorial.
1. Download gitbash and install it. I used this page to get the software: https://git-scm.com/downloads
2. Configure git. I used this code: git config --global user.name "Your Name" and then git config --global user.email “your.email@example.com”
3. Initialize a repository. Decide for a folder where you keep your files for the website. Navigate to the folder in Gitbash. I dragged and dropped the folderpath into Gitbash and then wrote this code: git init
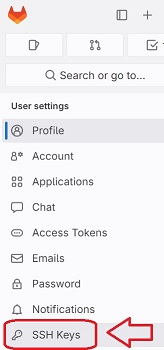
4. Generate a SSH key and add the key to Gitlab.First I generated the key with this code: ssh-keygen -t rsa -C "your_email@mail.com" I then found the key with this command: cat ~/.ssh/id_rsa.pub. Also do this before you generate the key to see if you already have one. I copied it (rightclick>copy), opened GitLab https://gitlab.fabcloud.org/ and inserted the key from the user settings in GitLab.
When everything is setup you can start working.
The Workflow: (Pull) - Add - commit - push
1. Add files to the staging area. I used the command: git add “filename”
2. Commit changes. Remember to make messages that make sense afterwards. I keep telling myself that others should be able to understand my messages. I used the command: git commit -m "Your commit message"
3. Push the file to gitlab and let the world see your files. I used the command: git push
The website
There was a template ready for us that we could use. I found the design a bit boring (no offense). I looked through different online sites with templates and ended up choosing the template “phantom” from https://html5up.net/. I downloaded the files and put them in my folder.
About HTML for website development:
HTML is essential for website development. Without HTML we would not have organized and made the internet accessible like we know it today. You could say that HTML is the backbone that supports all types of content on the internet. Besides that it is easy to learn, because of its simple text-based structure. It is versatile, - you can create content that goes from simple web-pages to complex applications. And it can be read by all webbrowsers.
HTML stands for HyperText Markup Language. It is a standard markup language used to create webpages and makes the content appear or act in a certain way.
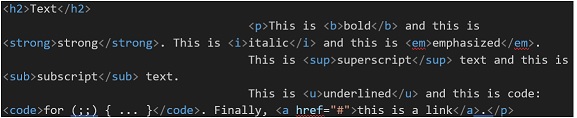
Some of the basics that I have used to write the code and that helped me a lot when I started are put toghether on this page:
LINK to page abouts ELEMENTS in HTML
Editing the code
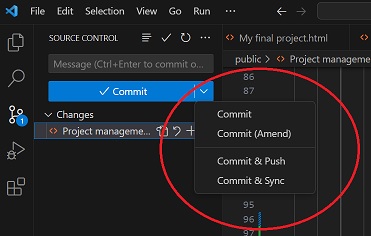
To edit the code I chose “Visual Studio Code”. I didn’t know the software, but I found it very easy to use. I also found out that the git process could be controlled from this software.
How I edited the template and explaining what I learned through that.
I edited the template by using some of the basic formatting we were presented in class, like
I used those commands when I worked through my text. While building the website on the go I soon needed to insert images. I did this by copying from the template and changing the text so it pointed at the image I wanted to use. I also found out how to make links to my social media pages. Again I went through the template and made changes to the commands that where already there and used that as a procedure to personalize my page with links to external webpages
You find my Fab Academy Student Agreement here:
Download DOCX File